Riding the Fox finally has a home here!
I went and bought myself a fancy pants domain and now have a space on the internet all my own to put up my art. I've only put up my current sketchbooks and art. I'll have to go digging for older stuff. It's nice to have someplace I can showcase my work. I'm still deciding if I want to incorporate the blog into it, or keep this blog here. I like what Blogger can do, but I kind of want everything consolidated. Especially since I'm terrible at keeping up with social media. You would think that Blogger would incorporate better with Google Sites, but maybe that will be a future improvement.
I think my goal for the year should be to work on being more consistent at posting things on Instagram and here on the blog. I've pretty much shuttered Tumblr since starting to write here, and I hate Facebook, so I only have an account there for a business account on Instagram. Don't try to find me on Facebook, I don't post anything there. I like Instagram still, even though they're owned by Facebook. If there is an alternative to Instagram that is visually similar and user friendly, please let me know. I plan on keeping Instagram and Pinterest active for RtF. That's about as much as I can handle social media wise.

Tuesday, June 4, 2019
Thursday, April 25, 2019
Riding the Fox on Zazzle!
My first art love is drawing. I've been doodling since I could hold a pencil. All throughout high school I took as many art classes as I had time for. 2D art is my go-to, hands down favorite. I don't have access to a good enough printer to do my own prints, and I always liked the idea of functional art, so I've been looking for a home for my flatter designs. Embroidery is fun and popular, but each piece is a one-off. I usually don't repeat my work. So, aside from the one lucky recipient of a piece of embroidery art, I can't share what I make with a wider audience.
Now, I found Zazzle and created a shop.There's not much there yet, but to test things out I made a keychain with my cat, Bones.
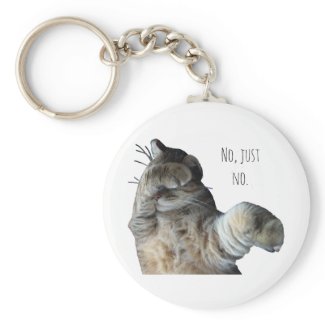
No, just no. Bones the Cat Keychain
by RidingTheFox
My son, Alex, says she looks like she's dabbing, and wants the text to read "Dab", but that's his generation's thing. Maybe if it gets enough attention, I'll do another run of them that way.
Bones has been one of our two cats for quite a few years. We got her when she was approximately 3 years old from the local Humane Society after one of our other cats died. While the husband and Alex were looking at cute, fluffy kittens, I kept being drawn back to her cage. She was just sitting there, with a patch shaved out of her side, one ear was clipped, and she just looked miserable. But, when we brought her into the little visitation room, she had the biggest purr I have ever heard.
We decided that she was the cat for us. The Humane Society told us that she was a stray, had probably had a litter of kittens sometime recently, the shaved patch was where they had to dig out a pellet that someone had shot her with, and to top it all off, someone had smashed her face so hard they had to remove her canine teeth on the top. It was her first day out on the floor. We took her home and it's been canned food and cuddles ever since.
Saturday, February 9, 2019
SPIDER!
So, the Husband found a spider packed in a box of inventory for the store he works at. From what I can tell, it's a giant crab spider, or huntsman spider. It's butt and a couple legs had fallen off, but I was able to reassemble it to the best of my ability. It is approximately 4" wide, from furthest tip to tip.
I coated it in UV resin, (which is awesome and fun and I'm really going to have to get more so I can master working with it) while positioning the legs.
When it's completely done, I'll turn it into a necklace.
 I need to trim up the excess resin, maybe add something shiny. I'm leaning towards using ribbon instead of chain, but that may change. Chain may be closer to a spiderweb look, but I like how ribbon works as a necklace.
This is a real spider, procured as ethically as possible. I don't kill creatures for my art. If I see an insect or other critter already dead, I'll use it. This one was found already dead, unfortunately shipped with merchandise from unknown lands. I'm hoping it will find its way into someone's life who will love and appreciate the beauty (and creepiness) of this big-ass arachnid.
I coated it in UV resin, (which is awesome and fun and I'm really going to have to get more so I can master working with it) while positioning the legs.
When it's completely done, I'll turn it into a necklace.

This is a real spider, procured as ethically as possible. I don't kill creatures for my art. If I see an insect or other critter already dead, I'll use it. This one was found already dead, unfortunately shipped with merchandise from unknown lands. I'm hoping it will find its way into someone's life who will love and appreciate the beauty (and creepiness) of this big-ass arachnid.
Monday, October 8, 2018


Tuesday, October 2, 2018
Inktober and other artsy stuff
So, the Husband talked me into doing this Inktober thing. I haven't done a art prompt/challenge thing before, so it should be interesting. Ink also isn't my favorite medium to work with, so it really is something of a challenge. I am following the Inktober.com official prompt list.

As I usually have a pencil on hand, I will most likely be doing pencil under-drawings. I am comfortable doing a straight-up ball point drawing without a pencil crutch, I definitely will need the pencil for any attempts with a marker. I'm not that familiar with how marker and other inks behave.

As a connection to the shop, all my embroidery begins as a drawing. I transfer a copy of the base drawing on to tracing paper, pin it to the hoop I'm embroidering, and stitch a basic outline before removing the paper. The original drawing is used as a reference as I stitch. If I am stitching something that has a real-life counterpart (like the rabbit iron-on patch) I will use photos found online for color, shading, and position references, but the underlying drawing is always mine. While every embroidered item is by it's hand stitched nature, is unique, I like having the reference drawing on hand in case I wanted to stitch it again.
Wednesday, May 30, 2018
Lessons Learned
I now have a very firm understanding of why you shouldn't use fresh flowers in resin. I have two delightful carnation bud designs that I neglected to even seal with Mod Podge, let alone allow to dry. They were beautiful, soft pink and took the resin wonderfully. But then they started to change. They are becoming a muddy, sickly color. The leaves and stems are starting to develop black spots. Overall, they turned from delightful to horrendous.

 The greens went from vibrant and spring-like to pale and sickly. The pink was soft and sweet, now it's muddy and rotten.
 But, the design and layout is still one of my favorites. I love the cluster of flowers from large to small, finishing with tiny, unopened buds. The resin coated the flowers wonderfully. A nice, even coat that isn't too thin so the flowers don't break. The second necklace is smaller, with just four buds, but there is still a nice variation in size and bloom. There must have been just enough air and moisture to allow the flowers to begin to rot. It is an interesting study in decay, however.
Once I get my hands on another bunch of buds I will definitely try this design again. I will continue my quest to find a way to dry and seal the flowers so I can preserve their form at their peak.
So, let this be a lesson to anyone who wants to cover flowers in resin. Drying them and sealing them is not optional. Unless you like muddy gross flowers that were formally gorgeous.
Wednesday, May 2, 2018
Floriography
I know, I know, I'm terrible about updating. I think I need to set an alarm to remind me to post about what I'm working on.
I've been practicing bead embroidery, and learning how to use a beading loom. I'm taking a small break from resin, and feeling the itch to work with polymer clay again. Right now, however, I'm exercising the painter in me. I'm working on a series of sympathy cards featuring flowers typically used in funeral arrangements with their associated Victorian floriography meanings.
Starting with flower picture references, I drew pencil sketches on tracing paper and transferred them to watercolor paper. The tracing paper sketches will also make them easier to transfer them to fabric for embroidery, if I decide to go that route. Next, I painted the flowers in watercolors. One personal quirk with my painting is that I typically use only one or two small brushes for an entire painting. After all the flowers were painted and dry, I scanned them into the computer with as high a resolution as the scanner would let me, since I intend to have them printed.
 This is the scanned in, very rough painted yarrow flower. The yarrow was the last one I drew, and I really didn't want to draw the individual little buds in the yellow part. It's placement in the bottom corner of the page rather than centered is so I can add in text. My handwriting is not the neatest or prettiest, so I prefer typed text. I am using a font called Bilbo, found on FontSquirrel.com. Font Squirrel is my favorite source for fun fonts that are available for commercial use. (this is not an ad for Font Squirrel, I just really like them and think it's a good resource for anyone else looking for awesome fonts)
In floriography, yarrow means undying love. While it's not typically used in flower arrangements, that I've seen anyway, it is still a pretty and meaningful little herb.
I use GIMP 2 for image manipulation and digital painting. It's a very nice free alternative to Photoshop. (also not an ad) I cleaned up the background, added a bit of color and outlining, and inserted the text.
 Currently, I have 12 flowers painted, and ready to be worked on in GIMP, including the yarrow.
I am working on a carnation next, then a mum, a rose, orchids, azaleas, gladioli, irises, stargazer lilies, juniper, rosemary and tarragon.
Subscribe to:
Posts (Atom)